page
two
Use the History palette to undo the Poster Edges
filter and the Blend Mode change. Then, with the background copy
layer selected in the Layers palette,
choose Filter > Artistic > Dry Brush. Click OK to accept
the default settings and apply the filter.
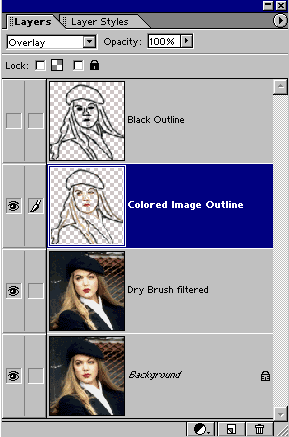
In the Layers palette, click on
the Colored Image Outline layer and change its blend mode to Overlay.
At this point, your Layers palette
should look like this.
The first image shown below is of the filtered
layer only. Visibility of the Colored Image Outline layer was
turned off so you could see what the filtered image looked like
without the addition of the outlining method I’m teaching you
here.
Directly below that, is the image
with the Colored Image Outline layer’s visibility turned back
on. You can see the difference that this technique makes in preserving
and accentuating image detail.
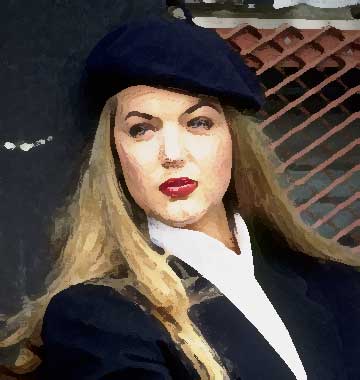
Dry Brush filter without outline layer

Dry Brush with Overlay outline
The last filter I’ll show you for this particular image is the
Watercolor filter. To apply it, step back in History as we did above, select the background
copy layer in the Layers palette,
and then choose Filter > Artistic > Watercolor.
The Watercolor filtering was so
disruptive to the image that using a blend mode to merge the Colored
Image Outline layer was not sufficient to preserve image detail.
Therefore, I created a duplicate of the Colored Image Outline
layer (drag it onto the New Layer button, or choose Duplicate
Layer from the Layers palette menu).
I set the Blend Mode of the upper
of the two Colored Image Outline layers to Hard
Light. The lower copy’s blend mode was left at Normal, but
its Opacity was changed to 70 % as you can see in the Layers
palette illustration below.
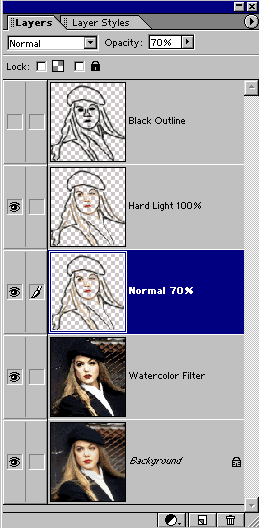
The results of this combination are shown below.
Next, I’ll show you how to apply
this technique to a bridal portrait.
continue on page three

Watercolor with Hard
Light
continue on page three